Zero Defect Inspection
Zero Defect Inspection = Customer Satisfaction
Mention the words “zero defects” or reject “Parts Per Million” (PPM’s) to any Quality Manager at a fastener manufacturing facility and you’re liable to send them running for cover. In today’s automotive and industrial fastener market, these two phrases have become words to live by. The demand for high quality, zero defect product has never been greater. Fastener users are making the conversion to automated assembly and manufacturing processes which dictate the need for 100% defect free, inspected, and certified product.
Fastener suppliers are being pushed towards 100% inspection which is quickly becoming the industry standard. Mectron Engineering Co., Saline, MI, has become an integral part of providing these manufacturers the means by which they can supply and satisfy their customers with defect free products. After all, the bottom line in any business is to satisfy customers. A satisfied customer is simply the best advertisement a supplier can have. Mectron Engineering’s goal is and always has been to create customers who rave about our equipment. In fact, by utilizing the Mectron Qualifier®, or any one of our many inspection systems, they can supply their end users with 100% defect free products on a consistent basis.
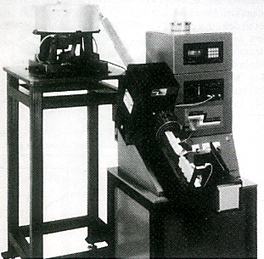
Today’s fastener supplier cannot afford to use inspection equipment which does anything less than 100% inspection of multiple features and metallurgical properties. Mectron’s Qualifier® provides the customer with both laser and Magnetic Imagery™ inspection methods. The patented laser portion utilizes 6 lasers to provide 12 inspection points through 360°. Each laser inspects 2 points which are 180° from each other on the surface of the part. As a part slides down the V-track through the laser array, each inspection point covers the entire length of the fastener. The 6 lasers combined are capable of inspecting 84 different part features with a diameter repeatability of .01 mm. An independent part outline is displayed on the instrument’s touch screen for each of the 6 lasers. The system software utilizes a multitude of inspection techniques that enables the user to inspect for physical defects and eliminate the non-functional fastener. These techniques provide the flexibility to measure from complex hard numbers to straight outline comparisons. The Qualifier® can detect different problems associated with SEMS products, patched products, and flanged hex shaped products, all of which pose special challenges due to orientation changes from piece to piece. Since the inception of the Qualifier®, extensive R&D and software enhancements have enabled us to help resolve special problems encountered by our customers arising from the increasing complexity of part configurations and manufacturing defects.
The Magnetic Imagery™ portion of the system is an advanced eddy current technique and provides the most complete on the fly metallurgical inspection available on the market today. Mectron’s Magnetic Imagery™, utilizing the signature Shadow Gate™, provides the user with the entire part signature compared to just a peak value offered by other eddy current systems. The Mectron MI 9000 instrument develops a magnetic image of each part as it passes through the Qualifier® to develop the part’s signature. This full signature provides the customer the opportunity to detect the most critical metallurgical defects such as cracks, material mixes, conductive platings and hardness by a visual deviation in the magnetic display. The percentage of deviation is also displayed and acceptable limits can be quickly defined using MI 9000’s touch screen programming capabilities. With today’s increased sensitivity to metallurgical defects and heat treated products as a result of the Fastener Quality Act, the use of Mectron’s Magnetic Imagery™ is essential to the fastener manufacturer as well as to the end user of the product. This is one reason General Motor’s Delphi Group has mandated metallurgical testing be performed on many fastener products supplied to them.
The Proof is in the Field
Since the introduction of the Qualifier® inspection systems to the marketplace in December of 1992, Mectron has placed numerous systems into various different manufacturing facilities. Most recently, systems have been installed at several fastener manufacturers in the U.K., France, Germany, Italy, Brazil, Australia, and China — all of which are feeling the pressures of ISO certifications and the importance of supplying zero defect products. The Mectron Qualifier® is being viewed as the world class leader in 100% inspection of fastener products.
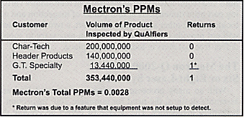
Domestically, the Qualifier® systems have many success stories, from the large volume — standard type fastener producer, to the smaller volume – high quality, tight tolerance specialty fastener manufacturer. Char-Tech (Livonia, MI), a QS-9000 registered company for the past 18 months, and part of Multifastener Corporation (Detroit, MI) is one such success story. David M. Gibson, General Manager of Char-Tech, reports the Mectron Inspection Systems on his shop floor for the inspection of bolts and nuts have enabled the company to ship over 200 million fasteners in the last three years without a single reject. Or, as Gibson says, “We have received no phone calls about rejects, and we appreciate that. Also, the systems are reliable, easy to set up and require little maintenance.” Char-Tech inspects an impressive 100% of all product they produce and supply to the Big Three, many Tier 2 suppliers, and most recently to the appliance industry.
 |
Mectron Q-4000 Qualifier® Laser and Magnetic Imagery™ Inspection Machine. |
 |
Mectron LT200 High Speed Lenght & Metallurgical Inspection Unit. |
A Mectron Inspection System is a capital investment which provides a rapid payback through problem elimination. Gibson adds “We justified the investment to the board of directors by explaining that we would eliminate costly fly-in service calls, excess freight costs associated with flying replacement parts and picking up non-conforming fasteners, and the loss of business due to defective product in the field.”
Gibson goes on to explain, “The Qualifiers® at Char-Tech have three uses. First, bolts not requiring outside processing go directly from the shop’s headers, where a few samples are audit-inspected on variable type gages for SPC, to the Qualifier®, where they are 100% inspected and sorted for manufacturing defects. Second, bolts coming back from outside processing are 100% inspected for manufacturing defects, foreign material, and the occasional incompletely plated piece that may be introduced into a batch. Third, we use the data collected by the Mectron machine as a tool to perform a Pareto analysis, and use the information to improve our processes. The Mectron equipment is not only for shipping good parts in the box; they add value to the product. It is this third item that also helps us to maintain our QS-9000 registration by providing documentation and continuous improvement.”
Header Products, Inc. (Romulus, MI) , is another of Mectron’s many satisfied customers who have used Qualifier® inspection systems for the past four years. Jack Stewart, Director of Quality at Header, reports that since their first installation of a Mectron Qualifier®, they have run an estimated 140 million pieces through the equipment without a return. Jack says, “I’ve only received one call in four years on Mectron sorted product, which resulted in not even being a reject. The customer found a part with a scratch and thought it was a crack. We showed them it was only a scratch and they approved the product.”
Header Products supplies high quality automotive components primarily to Tier 2 customers such as TRW, Johnson Controls and Specialty Stamping. Presently, Header is inspecting approximately 40% of their total production using Mectron equipment. However, zero defect pressures continue to increase that percentage. “In the last three years, every time we have gotten a rejection call on an existing product not inspected on the Mectron equipment, 75% of the time it is because the part is now in an automated assembly process and the occasional defective part is no longer acceptable” Stewart explains. And for a QS-9000 registered company like Header Products (July 1997), the need to reduce PPM’s is essential. “Our biggest success has been to reduce our external PPM’s by 75% since acquiring the Mectron inspection equipment. Any rejects or returns we experience are on products which are not presently being inspected on the Mectron equipment” Stewart added.

Often in manufacturing, we get so caught up in numbers, tolerances, production rates, etc., that we lose touch with the human aspect of our jobs. John Stevens, Quality Manager at G.T. Specialty Fasteners (Walled Lake, MI), brought it all into perspective during a recent conversation concerning Mectron’s equipment. “My family loves the Mectron equipment”, John stated. “It has allowed me to be home for dinner and spend time with my wife and children instead of phoning home from a hotel room, on the road, chasing quality problems.”
G.T. Specialty Fasteners is a QS-9000 bound company supplying Tier 2 customers such as Lear and Allied Signal, at the same time supplying Chrysler Corporation direct. G.T. utilizes Qualifiers® to inspect approximately 15% of the total product they produce. John Stevens reports that 13,440,000 pieces have been run through the Mectron equipment over the past two years, with only one reject. “The only reject we’ve received off the Qualifiers® was for a feature which was not identified to us as critical by our customer”, Stevens explained. “It was only .0015″ out of specification. Once we were aware of it, we adjusted the part setup on the Mectron to look for the defect, and it was never a problem again.” John went on to discuss all the defects the Mectron equipment allows him to inspect for. “Cracks, mis-formed heads, spiral and drunken threads, partial threads, mixed parts, plugged 6 lobes, mis-formed shoulders, partial plating, and bent parts, just to name a few, are all defects we inspect for. Since implementation of the Mectron Qualifiers®, we have not received any complaints from our customers for these types of defects.”
The bottom line for G.T. is that the Mectron equipment has provided their Q.C. Department the luxury of spending their time on other projects. “The time the Mectron saves us from chasing problems has allowed us to concentrate our efforts towards obtaining our QS-9000 certification, which is scheduled for December 1997”, John added. This is a success story that we are proud to be a part of.
Mectron Engineering is dedicated to working with customers as they strive to become world class suppliers and providing them with the inspection equipment to achieve their goals. In today’s world of zero defects and “think pharmaceutical”, 100% inspection is rapidly becoming the requirement for fastener manufacturers. In the end, zero is the only measurable number a customer wants to hear.
